Paper Succulent Garden~I love this because you can make it in so many different sizes and colors and really make it your own!
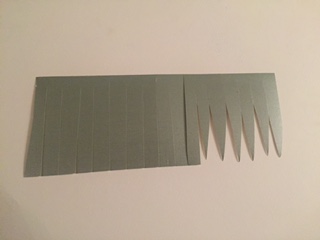
Step 1. Cut a strip of paper, the wider it is the taller your succulent will be.
I like mine to be 3 or 4 inches for my tallest one.
Step 2. Cut the paper into strips but not all the way down so they stay connected.
Step 3. Trim the tops into points.
Step 4. Add a dab of hot glue on the bottom and begin rolling.
Keep adding glue as you go to hold the bottom together.
Step 5. Bend all of your blades outward and curl the top in until its the shape you like.
This succulent is the same steps as the first one but the difference is to cut this one only one inch wide and it will come out as a short spiky plant. This one is super great for
filling in the small spaces of your garden.
Step 1. Start with a 2 to 3 inch wide piece of paper and cut it into strips but not all the way down like before.
Step 2. Roll all the strips up
Step 3. Roll up a tube of paper and glue the ends. Don't worry about making it too tall because you will trim the extra off at the end.
Step 4. Add a dab of glue on the top and begin spiraling the paper down the tube adding dabs of glue every little bit to keep the paper in place.
Step 5. Trim the stem to the height you like it. I prefer mine shorter because they stand better that way.
Step 1. Draw some templates for yourself. They should look like leaves with one rounder side. You will need 6 sizes and 3 of each size.
Step 2. Cut out all of your petals and cut a slit in the center of each rounded end.
Step 4. Over lap and glue the slits to form a small cup shape in the petals.
Step 5. Glue each set of 3 together.
Step 6. Start with the biggest cup and glue them in until you get to the smallest size.
Our finished mini-garden


