Monday, June 13, 2016

Diaper Cake

 ~Diaper Cake~


This project was thought up by my sister and she was the master mind behind all the steps for these cakes that we made for our sister-in-law's baby shower! We ended up using 124 diapers in each cake and made 3 of them in just a couple hours. The diapers are all individually rolled and kept together using mini rubber bands and each tier is held together using larger rubber bands.

Step 1. Start with 1 diaper and add diapers all the way around it, next put a rubber band around the entire outside. That will be your top tier.

Step 2. Repeat the entire first step, then add another layer of diapers around the outside and rubber band that entire layer.  This will be your second tier.

Step 3. Repeat the first two steps and add another layer around the entire tier to form your third tier. For this tier you will want to use a very large rubber band and preferably have another person there to help you stretch it wide enough to cover all the diapers.

Step 4. Repeat the first three steps again and add your next layer to form your fourth tier.  For this tier you will want to use two large rubber band to make sure the tier is held together super tight since it will be so large.

Step 5. This is the fun part, decorating! This cake was decorated for a baby boy shower so we went with a mustache theme but really any theme will look super cute on these cakes!


Tuesday, May 31, 2016

{Boho Inspiration}

Boho Inspiration~Mini Dream Catcher~ 


Step 1. Cut a strip of paper 12 inches long and 1/2 inch wide

Step 2. Glue the ends together to form a circle

Step 3. Cut and glue a lace circle onto your paper circle. I found it easier for me to cut the lace circle a little bigger than the paper circle and trim it after it is glued on.

Step 4. Cut strips of fabric and glue them to the bottom of your dream catcher.  I glued seed beads onto mine to add some color to the white lace. (feathers would be super cute on the bottom too!)

Extra Boho Inspiration~

This tambourine I decorated for my mom(I still have to give it to her!) I drew on the design with a sharpie, added the ribbon to a metal bracelet, and looped the bracelet through a hole on the bottom!


Monday, May 30, 2016

Root Beer Scented Edible Finger Paints

Root Beer Scented Edible Finger Paints


The Supplies you will need for this is:
-1 Cup Flour
-1 Teaspoon Salt
-2 Cups Water
-1 Teaspoon Root Beer Extract (or any extract you prefer)

Add the water and salt to a small pot and begin heating over medium heat.  Add the flour and whisk constantly to make sure it doesn't get lumpy.

The paint will start to thicken up pretty quickly, when it starts to get thick turn the heat down and keep stirring until its at the consistency you want for your paint.  I like mine to be thick enough where it won't run everywhere when the kids dump it onto their paper.

After you reach the thickness you like shut off the heat and add in your extract: we love the root beer extract but we have tried it with orange too and it smells just as great! 

Divide your paint into small bowls or a muffin tin works great too! Add a few drops of food coloring to each one and your paint is ready to go!

This is one of our favorite rainy day activities~Good luck on your masterpieces!


Sunday, May 29, 2016

{FLOWER CROWN}

The simplest Flower Crown you will ever make!

Part 1. Making the flowers

Step 1. Cut out a circle from felt. I like to use a cereal bowl as my template.(the bigger the circle the bigger your flower will be.)


Step 2. Cut your circle into a spiral shape.  I free hand mine but you could draw and cut along that line if you prefer.  Make it wobbly or cut bumps along the edge so your flower petals will have some different shapes when its together.

Step 3. Add a dab of hot glue on the middle of your spiral and start rolling your flower up. You will want to continue adding small amounts of glue as you roll.

Step 4. Glue the tail down on the flower and it is finished!

Part 2. Assembling the Crown

This part is the easiest!
Step 1. Cut a piece of thick ribbon long enough to go around your baby's head and tie a bow.

Step 2. Glue the flowers as close together as you can get them.  If you leave a gap it will look too spaced when the crown is on and trust me you do not want to be ripping these off and restarting (it will look like a mess with the hot glue if you do)

Step 3. If you think your crown needs a little something extra you could cut out and leaves or just leave it plain, they look super cute either way!


Friday, May 27, 2016

{PAPER SUCCULENT GARDEN}

Paper Succulent Garden~I love this because you can make it in so many different sizes and colors and really make it your own!


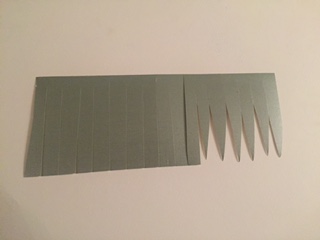
Step 1. Cut a strip of paper, the wider it is the taller your succulent will be.  
I like mine to be 3 or 4 inches for my tallest one.

Step 2. Cut the paper into strips but not all the way down so they stay connected.

Step 3. Trim the tops into points.


Step 4. Add a dab of hot glue on the bottom and begin rolling.
Keep adding glue as you go to hold the bottom together.

Step 5. Bend all of your blades outward and curl the top in until its the shape you like.

This succulent is the same steps as the first one but the difference is to cut this one only one inch wide and it will come out as a short spiky plant. This one is super great for
filling in the small spaces of your garden.


Step 1. Start with a 2 to 3 inch wide piece of paper and cut it into strips but not all the way down like before.

Step 2. Roll all the strips up

Step 3.  Roll up a tube of paper and glue the ends. Don't worry about making it too tall because you will trim the extra off at the end.

Step 4. Add a dab of glue on the top and begin spiraling the paper down the tube adding dabs of glue every little bit to keep the paper in place.


Step 5. Trim the stem to the height you like it.  I prefer mine shorter because they stand better that way.


Step 1.  Draw some templates for yourself. They should look like leaves with one rounder side. You will need 6 sizes and 3 of each size.

Step 2. Cut out all of your petals and cut a slit in the center of each rounded end.


Step 4. Over lap and glue the slits to form a small cup shape in the petals.

Step 5. Glue each set of 3 together.


Step 6.  Start with the biggest cup and glue them in until you get to the smallest size.

Our finished mini-garden